Opening Text Guide [in progress] When you load into the raid, defeat the aspect of Savathun (no need to clear any adds). Get on your sparrow and make your way to the payload. Every checkpoint three yellow bar abominations spawn (Knowledge Bearers). You get a debuff (Pervading Darkness) if you’re far from the payload. It chokes your vision at 7 stack, blinds at 8, kills at 10. Killing all abominations stops the stacks of darkness from growing and spawns some orange founts on the ground. Pick up the founts (can not hold more than 3 at a time) and dunk them on the payload.
Opening Text Guide [in progress] When you load into the raid, defeat the aspect of Savathun (no need to clear any adds). Get on your sparrow and make your way to the payload. Every checkpoint three yellow bar abominations spawn (Knowledge Bearers). You get a debuff (Pervading Darkness) if you’re far from the payload. It chokes your vision at 7 stack, blinds at 8, kills at 10. Killing all abominations stops the stacks of darkness from growing and spawns some orange founts on the ground. Pick up the founts (can not hold more than 3 at a time) and dunk them on the payload.
Picking up a fount gives Heightened Knowledge (1), Brimming Knowledge (2), Overflowing Knowledge (3). Dunking all of them also clears stacks of darkness. After you grab them all and bring them back to the payload, the payload will continue moving to the next area.The faster you grab the founts, the faster the encounter progresses. In the next area more knowledge barrers will spawn and more orange glowing founts will spawn. Do the same thing as you did in the last area, get to the payload, then continue on to the next area. Continue this process till you get to the end.
Once inside the building before the long drop, read the totems 3 glyphs for secret Rhulk chest access.
Acquisition Text Guide [in progress]
Encounter 1 / Acquisition:
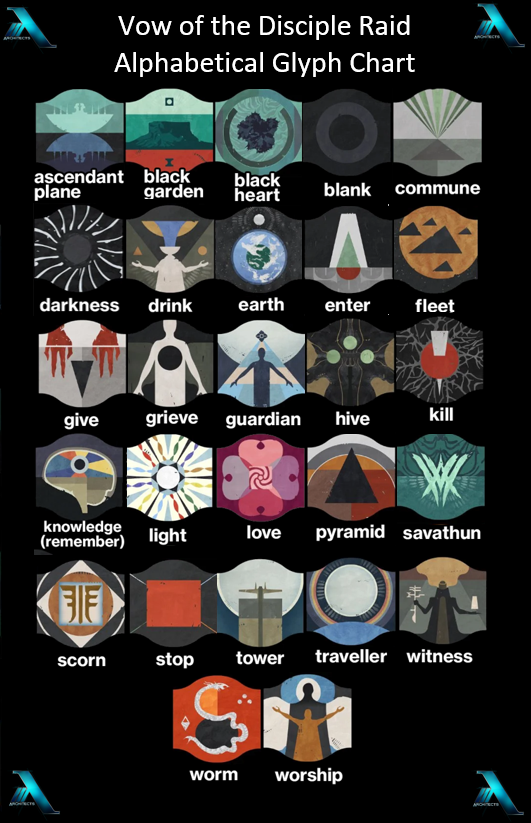
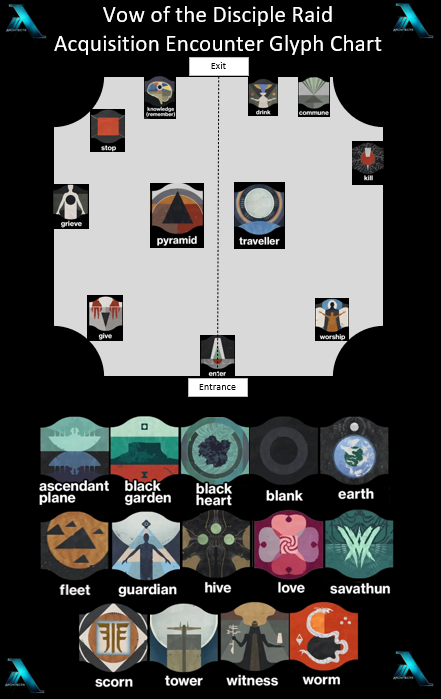
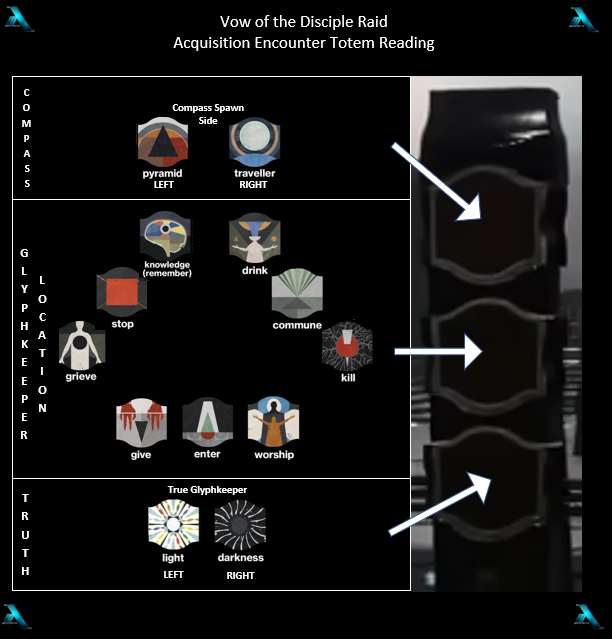
Enemies spawn from around the room’s sides, and attack 3 obelisks in the middle. Don’t let them. Don’t shoot the obelisks yourself. Shooting them fills them up. When the obelisks fill, you wipe. They also fill naturally. There’s a totem near each obelisk with three hexagons on. Shooting the crux above the obelisk turns it orange, allowing you to see glyphs on the totem. Killing one add reveals the first glyph. The second glyph is revealed after killing the screeb wave. The third symbol appears once somebody enters the room designated by the middle glyph.
One side of the large room has a Traveler glyph, the other has a Pyramid. Top glyph on the totem is always one of these, showing the side where the Disciple’s Compass spawns. The Compass is a Taken Knight that hides around the perimeter. Killing the Compass reveals the middle symbol, which corresponds to a door around the perimeter. Shooting the crux in the middle toggles the doors (same one you started the encounter with). Inside the room are two Glyph Keepers. There are also glyphs on each side of the room – Light is left and Darkness is right. The bottom glyph on the totem shows which side Glyph Keeper you’re supposed to kill. Killing a glyph keeper spawns another glyph in the air above it.
Killing all of the correct Glyph Keepers gives chat log “The obelisk awaits your offering” and glyphs appear on the obelisk. One obelisk has the glyphs from all three correct Glyph Keepers, not necessarily on the same side. Shoot those three glyphs on that obelisk only. There is no specific order, but you have to be very fast – they have to be shot almost sumultaneously. This is easier with several people shooting at the same time. There is a wave animation, you’ll have to shoot all three between waves. If you do it correctly, the chat log shows “The obelisk accepts your offering”.
If you shoot the wrong glyph on the obelisk you get a chat log: “The obelisk rejects your offering”. You get several wrong attempts before the obelisk fills and wipes you.
There are 3 full phases of glyphs, one phase per obelisk. Rinse and repeat till you complete the encounter.
Collection Text Guide [in progress]
The Caretaker:
3 roles, Seekers, ad clear, and stunners
Ad-clear clears ads, Stunners focus on keeping the boss stunned, and the seekers enter the dark room to find sigils. We sent in 1 person at the time, who grabs 3 sigils and gets out. Door can only be opened from outside so keep one seeker near the door to let them out.
Once Seeker 1 comes out with 3 or less sigils (depending on time and ease of finding), seeker 2 enters, and seeker 1 and 3 enters the sigil in the obelisk. You can have several people shooting the obelisk-sigil at once, but only one seeker worth of sigils at a time (there will be a message saying who’s sigils it is if several people are carrying sigils)
A failure to shoot the correct ones/too slow will remove your buff and the seeker have to go grab more.
9 Successful Sigils starts DPS phase. Don’t stress, time is plentiful if you’ve got a good boss stunner team.
DPS is done on the three plates surrounding the obelisk, which will glow yellow when active. The first plate is whichever is closest to the path the boss picked (left or right), 2nd is the middle one, and last is the 3rd, opposite 1. Uncertain if plates are Calus-esque (Buff runs out after standing on it) but we believe that the plates were time based, activating on queue and not characters standing on it.
Deal damage, and after DPS phase stairs fall down to the next floor, Rinse and repeat for 3 floors.
Last Stand drops another staircase to the attic, where its instantly a DPS phase, with 3 plates before wipe. The plates are in a line going straight at the boss, who will be walking away!
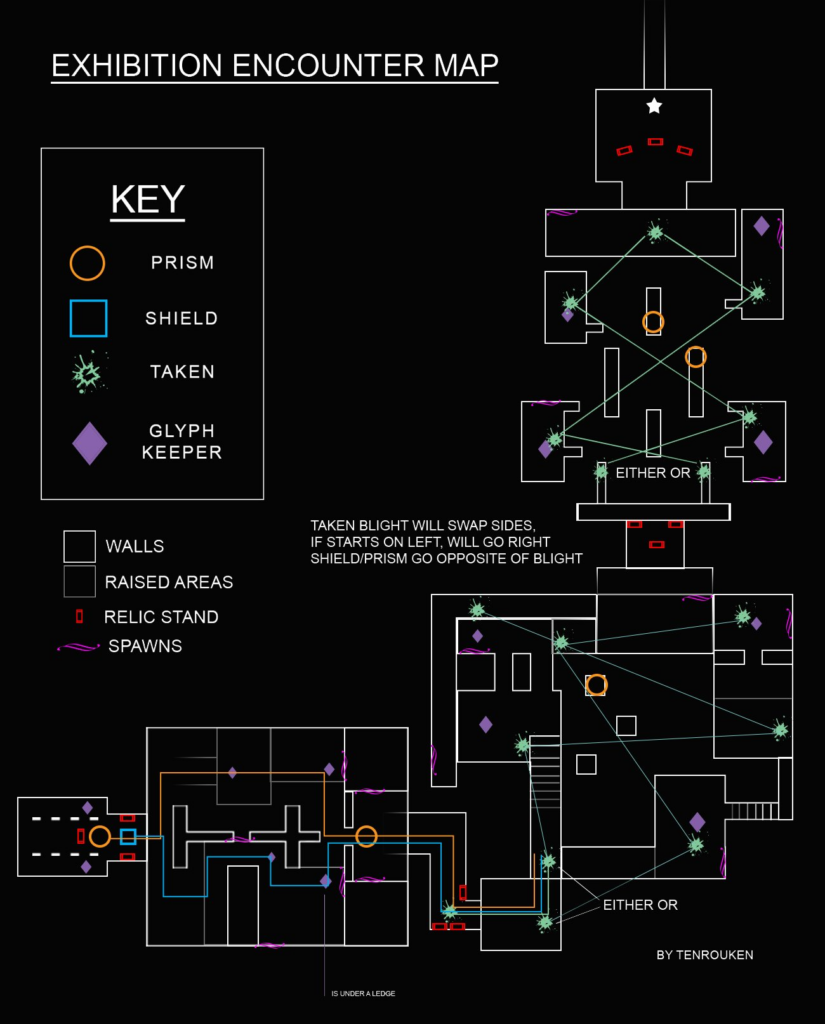
Exhibition Text Guide [in progress]
The encounter comes with sections, divided into Ante-chamber and full chamber.
In the Antechamber, you’ve got pedestals with various kinds of relics.
First Antechamber only holds a pyramid Splinter, holding it lets you shoot a constant beam of yellowish energy. (you can also use grenade) in Antechamber 2, you get the Aegis from VoG, and in Antechamber 3, you get a taken eye as in riven.
The encounter holds a wipe timer, but doing tactics extends it (Depositing relics into altars reset the timer to 1 min 15 sec, killing the knights extends the time (uncertain about amount)
It starts with ante-chamber one. Picking up the relic starts the encounter 2 Glyphkeepers Spawn in each side of the room (one Taken one Scorn) as well as a shielded knight. killing the glyphkeepers reveals 3 sigils, but only the relic holder can see the takens, and non relic holders see the scorns. You need to communicate and find the one sigil in common. To kill the knight, you need to shoot it with the splinter relic to remove the shield. After all adds are dead, sigils alight on the door to the next room, you need to find which sigil is shown in both glyphkeepers reveal, and shoot that one on the door.
Next room tells you to deposit Splinter, which spawns the Aegis, pick up both to continue. Room 2 adds the growing darkness debuff, but it stacks slowly and can be cleansed by Aegis quickly. The room is split in two, with adds existing and spawning in. Kill adds until Glyphkeepers spawn (More difficult adds give more progress to glyphkeepers). After both glyphkeepers are dead, a knight spawns to extend the time. This room requires you to kill 2 of each glyphkeeper, with set spawn locations and remember the 2 glyphs in common. Input the 2 glyphs to proceed to antechamber 3.
In Room 3, you’ve got the same tactics as room 2, but now there are invuln. taken blights that makes enemies undamageable. Cleanse (Grenade button) with the taken eye next to them to remove it. Move to the next room and exchange all your artifacts.
In room 4 you will do everything you did in room 3. It is a bit more of a jumping puzzle. Ads and glyph keepers will spawn on the left and right then in the section after that. Just use the same tactics you used for room 3.
Rhulk, Disciple of the Witness
Glyph phase
Walk forward to start the encounter. You will start on a massive symbol that will change glyphs as you stand on it, starting with Gift. There is an area you can’t walk into where the boss is. This area is ringed in a large orange bubble which will prevent you from advancing. Someone will get a buff called Leeching Force.
The first thing that happens is a darkness pillar spawns above the boss. This will give you Pervading Darkness stacks, which will wipe you at 10x. You want to break it as fast as possible. This clears Pervading Darkness and starts the glyph phase.
After breaking it, you can spawn in two others by standing on the glyph on the floor. These do not stack Pervading Darkness. If someone stands inside along with whoever has Leeching Force and breaks one of the smaller darkness pillars, they will get the Leeching Force buff. Have two people stand on the glyph along with the Leeching Force person, and break one each. They will both get Leech, and the person that originally had it loses theirs After breaking the darkness pillar, mobs start spawning along with two Glyph Keepers. Kill the Keepers to reveal three glyphs on top of the closest pillars on the left and on the right.
In the middle of the arena there are smaller totems that will also have sets of symbols along their sides. You will want to label the totems L1, L2, L3 (1 is close, 2 middle, 3 back) and similarly R1-R3 for the right side. Periodically, the Disciple shoots lasers from the back of the arena. Whoever holds the Leeching Force should jump into a laser, which will give them a buff called Emanating Force. This person will then be able to move forward into the orange bubble and will be your glyph depositor.
As that is happening, have both side teams read the glyphs from their respective pillars. One totem will have glyphs that match the pillar on its side. Which pillar has glyph over it changes with each dunk, switching sides and moving towards the back. Have the people with the emanating force buff go to those totems and deposit their Emanating Force. Dunk one side at a time, and remember to share Leeching Force between each dunk. You can dunk the final two at the same time. Every few dunks will spawn a Lacerated Abomination, and the boss teleports forward for a moment and shrinks the bubble. When the boss teleports back, another darkness pillar appears above him and starts stacking Pervading Darkness again. Break it as before.
At this point, another team member gets the Leeching Force buff. Share it like previously. Rinse and repeat. After you dunk the final totem, the boss spins his glaive and retreats into the area behind him, and you can follow. If you do not manage to dunk all the totems in time, the third darkness pillar to spawn is immune to damage and will wipe you.
DPS Phase
Run up the stairs to enter the boss arena. In this phase the boss will dash across the arena trying to hurt you. There will also be totems in the corners of the arena just like from the previous fight that will have symbols. These are always the same (see table below). During this fight the boss will do a swinging glaive attack, he will drop his glaive, turning it into a crux which you can shoot to reveal symbols you will need to match to deposit into the mini pillars. He will also have crit spots you need to hit.
Run into the arena to start the fight. In each corner is a totem, arranged as in the table below. The boss drops down on the floor and starts his attack rotation. He will first rush, then send beams in every direction around him. After a few rotations he will drop his glaive and turn it into a darkness pillar. One person must break the pillar, which will give them Leeching Light. Those who do not have Leeching can see which glyph to dunk at. The person with Leeching should get hit by one laser from the attack rotation and dunk in the correct corner. This will reveal a crit spot on the boss, which must be broken. Repeat this until you have dunked four times. Breaking the 4th crit spot starts DPS. The boss will grab his glaive and walk around with it. Deal damage to him while avoiding his attacks. He will keep doing his rotation occasionally, avoid attacks as usual. After a while of this he becomes immune. Return back to the glyph in the floor at the start. Glyph phase restarts, and you fight your way back to the arena. Rinse and repeat until final stand.
FINAL STAND:
The boss starts using his rotation continuously and you start stacking Pervading Darkness. If it reaches 10 before you kill the boss, you wipe.
Far far away, behind the word mountains, far from the countries Vokalia and Consonantia, there live the blind texts.
Bookmarksgrove
